Flaky Curry Puff

These curry puffs produces a layered flaky pastry. It is so yummy. As you can see from the photo, these curry puffs are made with two types of dough which is similar to puff pastry.

Sugar Paste Rose

I am making some roses for the topper for a Mother's Day cake. This was inspired by a cake made by my 80-year old cake decorator teacher.

Sambal Prawns

Sambal Prawns or Sambal Udang is a Malaysian dish with chilli paste and tomatoes to cool the spiciness.

Happy Birthday

My husband's birthday is this week. So I've made him this Chocolate Almond Birthday Cake. It turned out almost like a chocolate mud cake. But it's lighter and moist but still rich.

Raspberry Sorbet

Raspberry sorbet is a frozen dessert made from sweetened water, flavored with raspberry puree (or juice), wine, and/or liqueur.

Showing posts with label Snacks. Show all posts

Sunday, May 19, 2013

Almond Biscuits

Lately, I am on the lookout for recipes that is not time consuming but yet produce fantastic results. These almond biscuits are so easy to make and taste so good. I do still look at more elaborate recipes which have multiple elements but only use them when I have more time on my hands.

Ingredients
250g ground almonds
1 1/4 cup icing sugar
3 egg whites (50g eggs, if using 70g eggs then use 2 egg whites)
sesame seeds for coating (or almond flakes)

Method

  1. Preheat oven to 180C.
  2. Put almond and sifted icing sugar in a bowl.
  3. Add egg whites and mix with a fork.
  4. Using 2 teaspoons, roughly shape the mixture into balls.
  5. Roll the individual balls and coat with either sesame seeds or almond flakes.
  6. Put on a baking tray and bake in preheated oven for 10-15 mins.


Tuesday, April 30, 2013

Sesame Crisp


I call these crisp rather than biscuits because they are so thin and crispy. I was so impressed with the taste and the crispiness of these crisp when Eddie gave some to me. Eddie is really good at baking and cooking. After the first bite, I knew I had to bake some of these and asked for the recipe. These are so moreish but luckily there are quite healthy, using only a little oil or butter. I used coconut oil and I think can be substituted with almond or nut oil. My kids ate all of these within an hour of them being out of the oven.

You could also include flax seeds together with sesame seeds. I did not because I did not have any in my fridge. The ones that Eddie made had flax seeds and they added another dimension to the crisp.


Ingredients
40g oil/butter(melted)
100g icing sugar - sifted
4 eggs (4 * 60g) - beaten
120g plain flour
240g sesame seed (black and white) and flax seeds
almond flakes

Method
  1. Preheat oven to 160C.
  2. Add oil/butter, eggs, sifted icing sugar in a bowl and whisk to combine.
  3. Add sifted flour and sesame seeds. Mix well.
  4. Turn the baking tray upside down. This will make spreading the mixture easier as there is not sides to hinder spreading the mixture.
  5. Spoon some mixture onto the baking paper and spread it very thinly (almost 1mm) with a spatula. Make 2 pieces on one tray as this makes it brown more evenly.
  6. Sprinkle some almond flakes on the top. Bake for 10-15 minutes until golden brown.
  7. Break into pieces when cool. If you prefer, you can cut into squares when still hot. I prefer the rustic look. Return the ones that that are not browned into the oven for further baking.

Wednesday, April 3, 2013

Herb and garlic dip


What can you make with these three ingredients; cream cheese, garlic and parsley? Well, I made a herb and garlic dip with these ingredients. This is great as starters for a party or an afternoon snack for the kids. I served it with some brown rice crackers and the kids loved it. You can make this in a food processor or a thermomix like I did. It only takes a few minutes. Homemade dips are better tasting that supermarket dips and no extra additives are added.

Ingredients
1 clove of garlic(peeled)
1 bunch of flat leaf parsley(washed)
250g cream cheese

Steps
  1. Put the garlic and parsley in a food processor or thermomix. It took only 5 seconds at speed 7 on the thermomix. If using a food processor, blend until a bit less than final desired texture
  2. Scrape the herbs and garlic down the sides of bowl.
  3. Add the cream cheese and blend until your desired consistency is achieved. On the thermomix, it took 20 seconds on speed 4.

dNote: You can add some yoghurt or milk if you like a softer consistency. I did not add any as we like our dip that consistency. And you can try this recipe with any other herbs that you like.


Friday, May 27, 2011

Flaky Curry Puffs


These curry puffs produces a layered flaky pastry. It is so yummy. As you can see from the photo, these curry puffs are made with two types of dough which is similar to puff pastry. The original and most recipes normally divide the two dough in 12 or 24 equal portions and wrapping one dough with another and individually roll each one, which I normally do and this is very time consuming. But, one day when I was going to do that, had a aha moment and thought to myself why not roll it like puff pastry. I did and the result is the same and saves me plenty of time.

For water dough
* 200 g plain flour
* 100 ml water, mixed with
* 1/4 teaspoon salt
* 1 tablespoon butter

For butter dough
* 100 g plain flour
* 75 g butter

For filling
* 3 tbsp oil
* 220 g potatoes (cubed and par-boiled in some water, drained)
* 100 g big onions (cubed)
* 2 tablespoons curry powder, mixed with some water to make a paste
* 1 sprig curry leaf (optional)
* 1 tablespoon oyster sauce (optional)
* salt, to taste
* sugar, to taste
* light soy sauce, to taste
* 1 dash pepper

Steps

  1. You can make the doughs by hand or like me, use a food processor. This would save you plenty of time and i does a better job too. 
  2. To make WATER DOUGH, place flour in a mixing bowl.
  3. Rub in butter until it resembles breadcrumbs and add in the water. (Food processor, put flour and butter in bowl and mix until butter resembles breadcrumbs. Then add water and mix)
  4. Knead into a smooth dough and leave aside to rest for 10 minutes. Refrigerate for 30 minutes.
  5. To make BUTTER DOUGH, rub butter into the flour to form an oily dough. (Food processor: put flour and butter into bowl and mix until it form a dough). Refrigerate for 30 minutes.
  6. To make FILLING, heat pan with 3 tbsp oil.
  7. Fry onions until soft and add curry powder paste until fragrant.
  8. Add the other ingredients and add some enough water to cover the potatoes and fry till potatoes are cooked and dry. Add more water if needed.
  9. Cover the pan and turn the potatoes every now and then so that it does not burn.
  10. When cooked, dish onto a plate and cool before using.
  11. Roll the pastry as illustrated below and wrap the potatoes in the pastry. Seal the edges.
  12. Pinch the edges to form a scallop design or any design you fancy. 
  13. Deep fry in medium hot oil.

Note: You can make the filling a bit more saltier because when you eat it with the puff it will make the filling taste blander.

Two types of dough


Rol1 the water dough bigger (about 32 * 32 cm) than the butter dough(30 cm * 15 cm).


Wrap the butter dough by folding the water dough.


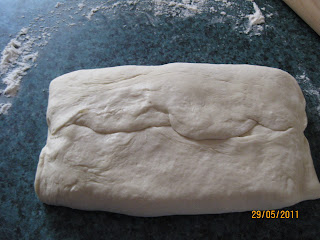
Roll the wrapped dough to a square and fold again similar way and roll again.


Then roll it into a sausage


Depending on the diameter of the "sausage" and how big you want your curry puffs, how thick to cut each dough. Try one, and then cut the rest.


Put a dough on the cut side and roll into a circle.


Wrap the potato mixture and fold.

Sunday, September 28, 2008

Avacado, Mango, Tango

I've just started work recently after being a stay at home mum for four years. So I do not get the time to surf the internet as often as before. For September's Daring Bakers' challenge, I assumed that posting date is the last day of the month. So I was going to do it this week end. I found out yesterday after visiting FBB's website that it was yesterday. So, I made my lavash about 2 hours ago. This month's challenge was hosted by Shellyfish . These are the short description of steps to make lavash (to view the full description, I'm sure shellyfish would post it on her site) :-
Makes 1 sheet pan of crackers

* 1 1/2 cups (6.75 oz) unbleached bread flour or gluten free flour blend (If you use a blend without xanthan gum, add 1 tsp xanthan or guar gum to the recipe)
* 1/2 tsp (.13 oz) salt
* 1/2 tsp (.055 oz) instant yeast
* 1 Tb (.75 oz) agave syrup or sugar
* 1 Tb (.5 oz) vegetable oil
* 1/3 to 1/2 cup + 2 Tb (3 to 4 oz) water, at room temperature
* Poppy seeds, sesame seeds, paprika, cumin seeds, caraway seeds, or kosher salt for toppings.

1. In a mixing bowl, stir together the flour, salt yeast, sugar, oil, and just enough water to bring everything together into a ball. You may not need the full 1/2 cup + 2 Tb of water, but be prepared to use it all if needed.


2. Sprinkle some flour on the counter and transfer the dough to the counter. Knead for about 10 minutes. The dough should not be tacky.

3. Ferment at room temperature for 90 minutes, or until the dough doubles in size. (You can also retard the dough overnight in the refrigerator immediately after kneading or mixing).

4. Roll the dough to about 15 inches by 12 inches. But I manage to roll into 1 1/2 sheets. One thicker and the other thinner. You might need to rest it every 5 minutes so that it relaxes and does not shrink back. Dust the top with some flour.
Transfer onto tray.


5. Preheat the oven to 350 degrees Fahrenheit(I used 180 degrees Celcius) with the oven rack on the middle shelf. Mist the top of the dough with water and sprinkle a covering of seeds or spices on the dough. I used sesame seeds on the thin dough and cumin seeds, sesame seeds and cracked pepper on the thick dough. I cut the dough using a pizza cutter. You can leave it in one piece and break it after baking.

6. Bake for 15 to 20 minutes, or until the crackers begin to brown evenly across the top (the time will depend on how thinly and evenly you rolled the dough).

7. When the crackers are baked, remove the pan from the oven and let them cool in the pan for about 10 minutes. You can then snap them apart or snap off shards and serve.


These lavash can be served with dips or salsa. Mangoes are starting to get into season. So I've made 2 salsa to go with it. I've used mango and avacado in one and avacado, seeded tomato and capsicum in another. Mixed it with some olive oil, squeeze of lemon juice and salt. Could add some red onions, herbs and chilli too. Tasty, healthy and yummy. Big hit with the kids.

Ingredients used for my salsa.

Thursday, July 24, 2008

Fresh versus Frozen

Do fresh vegetables and fruits contain more minerals and vitamins compared to frozen ones? Lately, there has been reports to state that frozen is just as good if not better than fresh because it is snap frozen quite soon after harvesting. Is it true or are the reports conducted by the frozen food companies? I don't know.

I normally buy fresh. But I saw these frozen blueberries and mixed berries at the supermarket for AUD$3.90 for 450 grams. Much cheaper than the fresh ones even when berries are in season. And it's winter so I cannot even get fresh blueberries.

So, I've made some blueberry muffins following the recipe on the packet. Normally, I reduce the sugar in recipes but not this time. And it turned out to be just the right sweetness for me. I omitted white chocolate bits as I did not have any in the pantry. I think if I added white chocolate bits then I might reduce the sugar. It turned out moist and soft. I might try with wholemeal flour next time.

Ingredients :
1 cup frozen berries
2 cups self raising flour
3/4 cup firmly packed brown sugar
1/2 cup white chocolate bits
1 egg, lightly beaten
3/4 cup buttermilk
1/2 cup vegetable oil
1 tsp vanilla extract

Method:
  1. Pre-heat oven to 180 degrees Celcius.
  2. Sift all dry ingredients into a large bowl.
  3. Stir in everything else.
  4. Spoon mixture into muffin trays.
  5. Depending on the size of the muffins, bake from 20-30 minutes.


Tuesday, July 22, 2008

Inside Out Sushi


Sushi is one of our favourite food. My kids can go through lots of it which I am happy about since it is healthy and full of Omega 3(salmon). My son's homework this week was to cook a healthy meal with the family and document the process and he suggested sushi. I have made sushi a few times and I've always made the normal ones with the nori sheet on the outside. Have you ever wondered how they make the inside out sushi? I have and this is my first time making the inside out sushi. I learned this from the Nintendo DS game, Cooking Guide. Far out, eh?


The way to do this is putting a cling wrap on the bamboo roller and then spread the rice on it. Roll the ingredient with the nori sheet and place this on top of the rice and roll like normal sushi. Remove the cling wrap after the sushi is cut. Ta da! I use the packet sushi powder to flavour the rice instead of making my own vinegar and sugar mixture.

Friday, June 20, 2008

My First Daring Bakers Challenge

I have seen quite a few bloggers that are members of The Daring Bakers. Initially, I did not know what it was. Curiousity got the better of me and I found out that they(now we) are a group that bakes. There's a challenge every month to complete. This month's challenge was a Danish Pastry Braid.

I was excited when I received the email. But as I was reading the recipe, I started dreading it. I doubted myself. I have not baked such elaborate pastry before. Imagine, the pastry involved making it, put it in the fridge for 30 minutes. Then rolling and folding and back in the fridge for another 30 minutes. Repeat the last step another 3 times. Then back in the fridge for 5 hours. Then rolling it and make the braid and other pastries. Then proof it for 2 hours before baking. But I suppose that is why it is call a challenge. And I suppose I'll learn something new. Da..da..da.. always look at the bright side of life da..da..da.

As it turns out, I surprised myself. The braid turned out delicious and no drama making the pastry except the long process.


The challenge was to make a braid which is I filled with apple filling. Then with the rest of the pastry I made a assorted Danish Pastry. The other two fillings are custard and black sesame seed paste. They are all delicious.


This is the recipe (you have been warned):-

Makes 2-1/2 pounds dough

Ingredients
For the dough (Detrempe)
1 ounce fresh yeast or 1 tablespoon active dry yeast
1/2 cup whole milk
1/3 cup sugar
Zest of 1 orange, finely grated
3/4 teaspoon ground cardamom
1-1/2 teaspoons vanilla extract
1/2 vanilla bean, split and scraped
2 large eggs, chilled
1/4 cup fresh orange juice
3-1/4 cups all-purpose flour
1 teaspoon salt

For the butter block (Beurrage)
1/2 pound (2 sticks or 225 grams) cold unsalted butter
1/4 cup all-purpose flour

DOUGH
1. Combine yeast and milk in a bowl with a hand mixer on low speed or a whisk.
2. Add sugar, orange zest, cardamom, vanilla extract, vanilla seeds, eggs, and orange juice and mix well.
3. Sift flour and salt on your working surface and make a fountain.
4. Pour the liquid in the middle of the fountain. With your fingertips, mix the liquid and the flour starting from the middle of the fountain, slowly working towards the edges.
5. When the ingredients have been incorporated start kneading the dough with the heel of your hands until it becomes smooth and easy to work with, around 5 to 7 minutes. You might need to add more flour if the dough is sticky.
6. Put it in the fridge for 30 minutes.

BUTTER BLOCK
1. Combine butter and flour in the bowl of a mixer fitted with a paddle attachment and beat on medium speed for 1 minute. Scrape down the sides of the bowl and the paddle and then beat for 1 minute more, or until smooth and lump free. Set aside at room temperature.
2. After the dough has chilled 30 minutes, turn it out onto a lightly floured surface. Roll the dough into a rectangle approximately 18 x 13 inches and ¼ inch thick. The dough may be sticky, so keep dusting it lightly with flour.
3. Spread the butter evenly over two thirds of the dough, the left side (ie 12 x 13 inches). Fold the left dough to the right, covering half of the butter. Fold the right third of the rectangle over the center third. The first turn has now been completed. The dough now measures roughly 6 x 13 inches.
4. Place the dough on a baking sheet, wrap it in plastic wrap, and refrigerate for 30 minutes.
5. Repeat the rolling and folding 3 more times but without the butter. The 6 x 13 inches dough should be rolled to 18 x 13 inches dough. So the width becomes the length. After every rolling and folding, the dough has to be refrigerated for 30 minutes.
6. Refrigerate the dough after the final turn for at least 5 hours or overnight. The Danish dough is now ready to be used. If you will not be using the dough within 24 hours, freeze it. To do this, roll the dough out to about 1 inch in thickness, wrap tightly in plastic wrap, and freeze. Defrost the dough slowly in the refrigerator for easiest handling. Danish dough will keep in the freezer for up to 1 month.


APPLE FILLING
Makes enough for two braids

Ingredients
4 Fuji or other apples, peeled, cored, and cut into ¼-inch pieces, I used granny smith
1/2 cup sugar
1 tsp. ground cinnamon
1/2 vanilla bean, split and scraped
1/4 cup fresh lemon juice
4 tablespoons unsalted butter

1. Melt the butter in a sauté pan over medium heat until slightly nutty in color, about 6 - 8 minutes.
2. Then add the all the other ingredients and sauté until apples are softened and caramelized, 10 to 15 minutes. If you’ve chosen Fujis, the apples will be caramelized, but have still retained their shape.
3. Cool completely before forming the braid. (If making ahead, cool to room temperature, seal, and refrigerate.) They will cool faster when spread in a thin layer over the surface of the sheet. After they have cooled, the filling can be stored in the refrigerator for up to 3 days. Left over filling can be used as an ice cream topping, for muffins, cheesecake, or other pastries.

DANISH BRAID
Makes enough for 2 large braids

Ingredients
1 recipe Danish Dough (see below)
2 cups apple filling, jam, or preserves (see below)

For the egg wash: 1 large egg, plus 1 large egg yolk

1. Line a baking sheet with a silicone mat or parchment paper. On a lightly floured surface, roll the Danish Dough into a 15 x 20-inch rectangle, ¼ inch thick. If the dough seems elastic and shrinks back when rolled, let it rest for a few minutes, then roll again. Place the dough on the baking sheet.
2. Along one long side of the pastry make parallel, 5-inch-long cuts with a knife or rolling pastry wheel, each about 1 inch apart. Repeat on the opposite side, making sure to line up the cuts with those you’ve already made.
3. Spoon the filling you’ve chosen to fill your braid down the center of the rectangle. Starting with the top and bottom “flaps”, fold the top flap down over the filling to cover. Next, fold the bottom “flap” up to cover filling. This helps keep the braid neat and helps to hold in the filling. Now begin folding the cut side strips of dough over the filling, alternating first left, then right, left, right, until finished. Trim any excess dough and tuck in the ends.

Egg Wash
Whisk together the whole egg and yolk in a bowl and with a pastry brush, lightly coat the braid.

Proofing and Baking
1. Spray cooking oil (Pam…) onto a piece of plastic wrap, and place over the braid. Proof at room temperature or, if possible, in a controlled 90 degree F environment for about 2 hours, or until doubled in volume and light to the touch.
2. Near the end of proofing, preheat oven to 400 degrees F. Position a rack in the center of the oven.
3. Bake for 10 minutes, then rotate the pan so that the side of the braid previously in the back of the oven is now in the front. Lower the oven temperature to 350 degrees F, and bake about 15-20 minutes more, or until golden brown. Cool and serve the braid either still warm from the oven or at room temperature. The cooled braid can be wrapped airtight and stored in the refrigerator for up to 2 days, or freeze for 1 month.

Be patient if you want to try this recipe.

Monday, June 16, 2008

Chocolate Chip Cookies


I baked some chocolate chip cookies yesterday. This recipe appears on a wrapper of a can of condensed milk and I have baked it many times. It's my favourite chocolate chip cookies. This recipe does not contain egg for people allergic to eggs. I normally double the quantity as my bunch finishes it so quickly. The quantity here yields about 35 average size cookies.

Ingredients
180 grams butter
1/3 cup sugar
1/2 cup sweetened condensed milk
1 1/2 cup self raising flour
250 grams dark choc bits (choc chips)

Steps
1. Preheat oven to 180 Celcius.
2. Beat butter and sugar until creamy, beat in condensed milk.
3. Add flour and choc chips and stir until combined.
4. Roll spoonfuls into small balls and flatten slightly.
5. Bake for 15 minutes until golden.


They comes out nice and chewy from the oven. It does crisp up a little when it is cool. How much it crisp up depend on how golden it is baked.

Tips 
If you have a small ice cream scoop that will make forming the balls so much easier and you will get even shapes and size. I have not been able to find a small ice cream scoop so I use 2 spoons to avoid getting my hands messy.

Tuesday, March 25, 2008

Macarons


I have been reading about the famous macarons craze in Singapore and Malaysia. So I have to try making macarons and see what all the fuzz was about. After researching some recipes, I've decided to use this recipe.

The first important thing about whisking egg whites is that the bowl must not have any oil, fat or any egg yolk at all. The other is the egg whites must be at room temperature.

120 gms almond meal
150 gms icing sugar
1 tablespoon cocoa powder
3 egg whites
4 tablespoon castor sugar
a pinch of cream of tartar

  1. Sieve the first three ingredients together.
  2. Add a pinch of cream of tartar into the egg whites and beat at medium speed.
  3. Gradually add caster sugar while beating the egg whites until medium peaks and glossy.
  4. Gently fold in the sifted ingredients in two batches.
  5. Pipe them on baking sheets. I made mine about 3-4 cms in diameter.
  6. Let it rest for about 20 minutes while pre-heating oven to 170Celcius.
  7. Bake for about 13 minutes depending on oven.
  8. Cool down before sandwiching with chocolate ganache.

I read that after piping, you have to drop the tray onto the bench to get rid of any trapped air. I did that, but I don't think it got rid of any trapped air. Time to prepare the ganache.


100 grams dark chocolate
50mls thickened cream

Heat up the cream in a double boil. When it is hot enough to melt the chocolate, take it of the double boil and pour in the chopped chocolate. Stir until the chocolate is melted. Put it in the refrigerator until thickened before using it to sandwich two macarons together.

The macarons tasted so good and I now understand what all the fuzz is about. As I do not have very sweet tooth, I still found this a bit sweet eventhough I have reduced the sugar. Next time, I'll reduce the icing sugar to 120 grams instead. And my macarons did have feet.